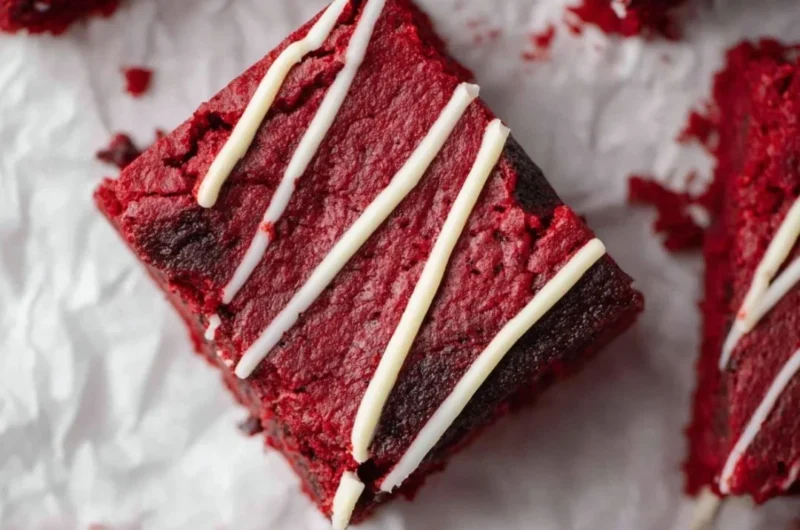
Red Velvet Brownies: A Cozy Baking Adventure
There’s something undeniably magical about the combination of vibrant colors and rich flavors that a batch of Red Velvet Brownies brings to the kitchen. As the weather cools and the first whispers of winter nip at our noses, we often find ourselves longing for those cozy, comforting treats that make us feel warm inside. This recipe is one I hold dear, as it reminds me of sunny afternoons spent in my grandmother’s kitchen, where the sweet smell of chocolate and hints of vanilla would dance through the air. It evokes memories of laughter and joyous moments, and it’s all about the simple pleasure of baking.
If you’re in search of a creative, easy dessert that’s perfect for sharing during the Holiday season or any cozy gathering, look no further. This recipe for Red Velvet Brownies is just the ticket! With a fudgy texture and a touch of elegance, they are sure to become a favorite among friends and family. Trust me, this is one you’ll definitely want to pin for later!
Why You’ll Love This Recipe
- Decadent and Fudgy: These brownies are the perfect blend of rich chocolate flavor and the iconic red velvet taste.
- Easy to Make: With simple steps and common ingredients, baking these brownies feels like a breeze.
- Visually Stunning: The vibrant red color is not only eye-catching but also brings a festive cheer to any gathering.
- Customizable: You can mix in white chocolate chips or drizzle melted white chocolate for an extra indulgent touch.
- Perfect for Any Occasion: Whether it’s a Holiday party or a cozy movie night, these brownies are sure to impress!
Ingredients You’ll Need for Red Velvet Brownies
To recreate these delicious Red Velvet Brownies, make sure you have the following ingredients ready:
- 3/4 cup unsalted butter (melted)
- 2 oz chopped semi-sweet chocolate bar
- 1 & 1/4 cup granulated sugar
- 2 large eggs
- 2 teaspoons vanilla extract
- 1 teaspoon white vinegar
- 1/2 tablespoons red gel food coloring
- 2 tablespoons unsweetened cocoa powder
- 1 & 1/4 cup all-purpose flour
- 1/4 teaspoon salt
- 1/2 cup white chocolate chips (optional, mixed in the batter or melted and drizzled on top)
How to Make Red Velvet Brownies
Let’s make it together! Follow these simple and sensory-rich steps for a delightful baking experience:
- Preheat your oven to 350°F and line an 8×8 inch baking pan with parchment paper.
- In a large microwave-safe mixing bowl, melt the butter and chopped chocolate in the microwave in 30-second increments. Stir until fully melted and combined.
- Add in the granulated sugar and mix until well combined. Then, add in the eggs one at a time, beating well after each addition.
- Stir in the vanilla extract, white vinegar, and red food coloring until fully incorporated, creating that beautiful red hue.
- In a separate bowl, sift together the cocoa powder, flour, and salt to combine all dry ingredients.
- Gradually add the dry mixture to the wet ingredients, mixing until just combined. Be careful not to overmix! If desired, gently fold in the white chocolate chips into the brownie batter.
- Pour the luscious batter into the prepared baking pan and spread it evenly.
- Bake in the preheated oven for approximately 30-35 minutes, or until a toothpick inserted into the center comes out with a few moist crumbs (not wet batter).
- Allow the brownies to cool completely in the pan before cutting into squares.
- If you’d like, drizzle melted white chocolate on top for an extra touch, let it set, slice, and enjoy!
Fun Ways to Customize It
While these Red Velvet Brownies are delightful as they are, here are a few creative ideas to take them to the next level:
- Add Nuts: For a crunchy texture, try adding chopped pecans or walnuts into the batter or as a topping.
- Cream Cheese Frosting: Spread a layer of rich cream cheese frosting on top for a classic red velvet flavor.
- Chocolate Swirl: Create a chocolate swirl by adding a mix of melted chocolate throughout the brownie batter before baking.
- Minty Fresh: Incorporate a hint of mint extract for a refreshing twist that would brighten up the flavor.
Chef Emma’s Helpful Tips
- Make Ahead: These brownies can be made a day in advance. Just store them in an airtight container at room temperature to keep them fresh and moist.
- Perfect Slices: To achieve clean slices, use a plastic knife or a greased metal one for cutting through the fudgy layers.
- Storage Suggestions: Store any leftovers in an airtight container. They can be kept at room temperature for up to 3 days or in the fridge for up to a week.
- Ingredient Swaps: If you’re out of cocoa powder, you can substitute it with an equal amount of melted dark chocolate.
What’s Inside – Nutrition Breakdown
Each serving of these scrumptious Red Velvet Brownies (1 square, about 2.5 oz) contains approximately:
- Calories: 250
- Carbs: 30g
- Sugar: 20g
- Fat: 15g
- Protein: 3g
- Sodium: 120mg
Frequently Asked Questions
Can I make this ahead?
Yes! These brownies are perfect for making ahead of time. Just allow them to cool completely before storing.
Can I use different ingredients?
Absolutely! Feel free to swap out ingredients for your preferences. You can use different types of chocolate or even experiment with gluten-free flour.
How do I store leftovers?
Store your brownies in an airtight container at room temperature for up to 3 days, or in the refrigerator for about a week.
How long does it last?
When stored properly, these brownies can last up to a week in the refrigerator, if they last that long!
A Cozy Closing Note
Indulging in a warm, fudgy Red Velvet Brownie is like a warm hug on a chilly day. The richness and festive feel make these brownies a perfect addition to your dessert table this Holiday season or any cozy gathering. I hope you find as much joy in baking and sharing these treats as I do. Save this Red Velvet Brownies recipe to your Pinterest board so it’s ready when you need a cozy treat! Happy baking!